I just saw this listing on Shop Goodwill, and it caught my eye because it was so shiny, perfect, and beautiful - at a glance, anyway.
Really the first clue this is a reproduction is just that - it is TOO shiny and the decals are TOO colorful.
If nothing else gives it away, look for this - it's hard to see in the photo, but that big black plastic knob on the bed means PHONY.
Look at the metal and the hardware. These are NOT vintage Singer screws. Any pot metal on the machine also means it's a fake.
The metal quality is a dead giveaway
And PLEASE - how phony is this?
A genuine Singer of that era would have a serial number plate like this.
The latches give it away, too. It is possible an old case could have been repaired with new latches, but if you could see this in person, you'd see other clues that this isn't a vintage bentwood case.
PHONY!
(I hope the people bidding on this machine know what they're getting.)
If you have a low shank (vertical needle) zigzag sewing machine of ANY brand, you might consider one of these.
Singer Professional Buttonhole for Vertical Needle zigzag machines
While this is similar to the Singer Automatic Buttonholer for straight stitch, this one works with ZIGZAG machines. Rather than the attachment moving the fabric back and forth to create the zigzag stitch, the Professional Buttonholer is a smoother operation.
This is the Automatic Buttonholer - it moves the fabric back and forth to make the zigzag stitch
Here is the Professional Buttonholer on a Singer Genie. Notice that it uses the machine's zigzag, so there is much less movement of the fabric.
Super nice buttonholes, second to none. This one on a Singer 319
The set even includes the eyelet cam - almost impossible to find for the Automatic Buttonholer because it was sold separately
I've been through more Kenmores than I can count in search of the ultimate model (not all of them are included on this blog.) Every time I think I've found the best machine, I seem to find one just a little better.
Kenmore 158.17600
First, to recap, the 158.1941 is often referred to as the best machine in its category that Kenmore ever made. And it is a very fine machine, which is why I raved about it in a previous post. It only lacks a few features to keep it from being "perfect":
1. It doesn't take cams
2. It doesn't have L-C-R needle positions
3. No built-in buttonhole stitch
Well, as for #2, I've never seen that on any vintage Kenmore (so far, anyway.) But imagine my surprise to find that the 1760 is exactly the same machine as the 1941 but also takes cams, bringing it at least one step closer to perfect.
Yes, I can sew little duckies, trees, flowers and hearts on this machine! (Clearly, I am easily entertained in my old age.)
When I say exactly, I do mean it is EXACTLY the same as the 1941 in every way except for the cam feature (and there is a different top thread guide to keep the thread clear of the cam lid.)
Kenmore 1941 (left) and 1760 are otherwise identical in every way
Of course one of the best features is the free arm which I use when sewing bags
Topstitching on a crossbody bag
I used to resist super high shank (SHS) machines because the feet and accessories are not as easy to come by as low shank models. But now that I've gradually assembled a good collection of feet (supplemented by a SHS adaptor which allows you to use some- but not all - low shank feet.) I'm more enthusiastic.
Yes, I even have the SHS walking foot, which was a splurge
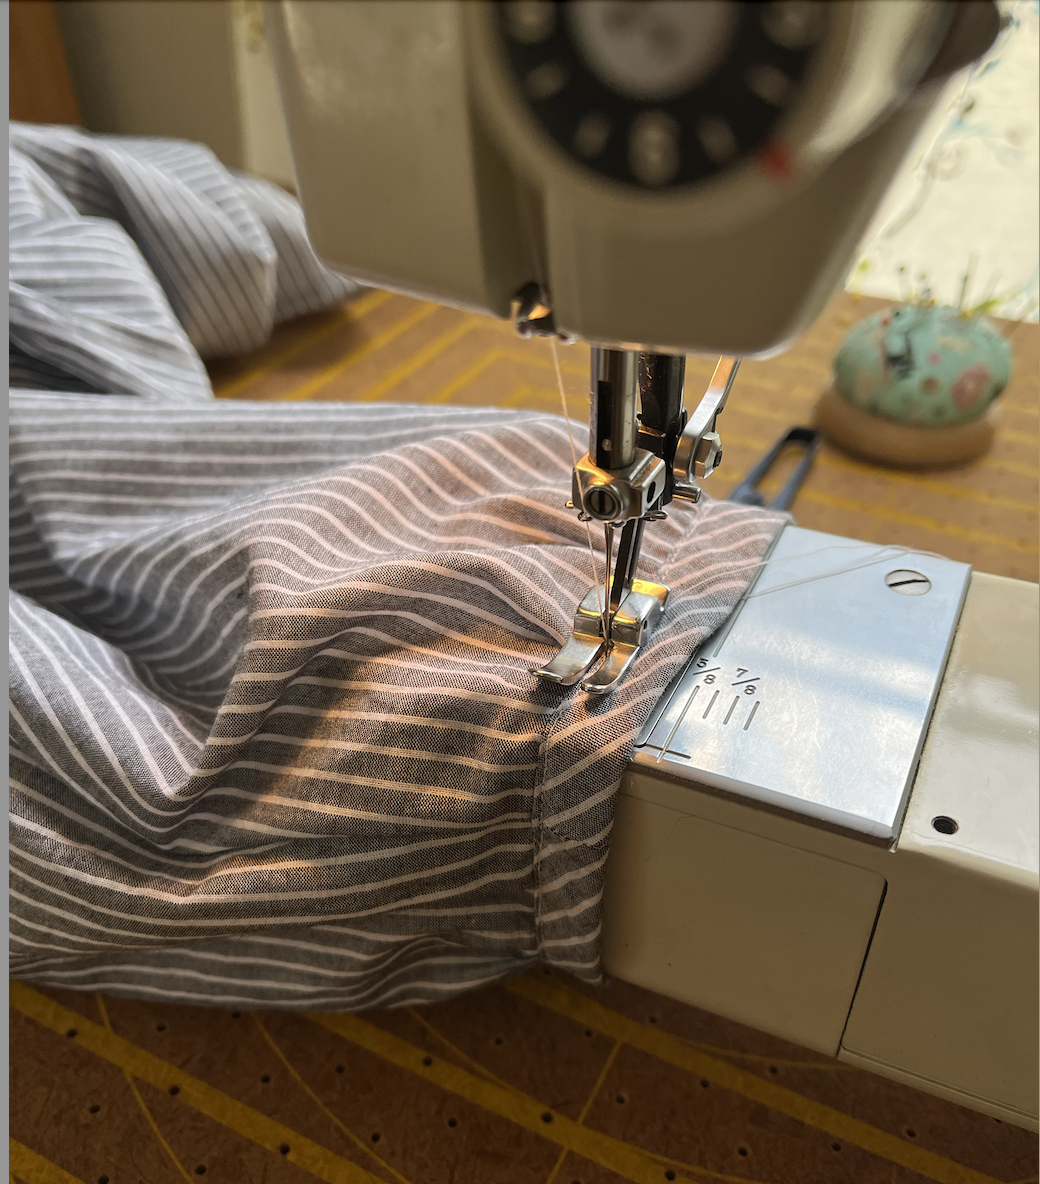
I used this machine to make a blouse and enjoyed every minute of sewing on it. One thing I love is that with the straight stitch plate, you can start on the very edge of your seam with even the finest fabric and this machine doesn't choke - like most Kenmores I've used, it has excellent piercing power at slower speeds. Although we usually use thick layers of heavy fabrics to demonstrate a machine's prowess, the performance on more delicate fabrics is just as important. I'm pleased to say this machine handles both beautifully.
I've spent more time recently collecting sewing machines and gadgets than actually sewing, so I dusted off an old pattern that's been in my collection for a while now. I liked it so much, I made it twice!
Butterick 5861, View D
The first is an inexpensive lightweight cotton shirting I bought at JoAnn.
Then after my "working muslin" I made the second top out of pricey Liberty Tana lawn. (I probably wouldn't have paid as much for a blouse RTW as I paid for this fabric!)
I enjoyed making the tucks and also playing with the stripes
Tuck detail - notice the tucks are CURVED. The stripes help point this out.
The back detail is a little different. These loose tunic tops are often shapeless and baggy in the back and this makes it a little more fitted. You sew rows of shirring with elastic thread between the darts.
I sewed this blouse on my recently acquired Kenmore 1760 which is my "new favorite" machine.
Kenmore 158.1760
As for the construction, this is a simple pattern, very easy to sew. It is a little time consuming to make the tucks and shirring, but those details add to the interest so I enjoyed the process. Once those two details are done, the rest goes together quickly - it even has easy raglan sleeves for those who hate to do set in sleeves.
However, there is a mistake in the pattern which will slow you down if you're not aware of it. The illustration shows the shoulder yoke applied BACKWARDS. The longer, sloped edge goes to the front of the garment (corresponding with the single notch) and the shorter perpendicular edge goes to the back (corresponding with the double notches). The illustration in the instructions shows it completely opposite.
Another mistake in the instructions concerns the neck binding. You cut a 1-1/2" bias strip then you are directed to press one edge in at the seam line (5'8") and trim it to 1/4". Then you sew the binding onto the neckline with a 5/8" seam allowance, and turn the folded edge over the seam. WRONG! Simple math tells you it isn't possible, since 5/8" x 2 = 1/1-4" That leaves barely 1/4" to cover the seam edge - it won't work. Take my word for it: press one edge in 1/4" (do NOT trim anything!), sew the strip onto the neckline with your 5/8" seam allowance, trim the seam to 1/4", and your binding will fold over and cover it perfectly and look just like the illustration.
(Ditto the binding on the cuff - I did NOT trim the strip as directed and it was perfect.)
Speaking of cuffs, this is where that free arm really shines!
I recently acquired a Kenmore monogrammer for my beloved 158.1774 (one of my favorite machines.) I've been using the Singer counterparts for a number of years now so I was anxious to see how the Kenmore version would stack up. I'll cut right to the chase before getting into the nitty-gritty details
Blue (left) are the Kenmore monograms, Pink is Singer.
If you're deciding which monogrammer(s) you might like to get for your own vintage machines, here is a rundown of how they all work. Honestly, there are pros and cons for each so I'm glad I have both sets!
Let's start with Singer which has TWO versions - the Deluxe Monogrammer which makes 1-1/2" letters and the regular monogrammer which makes 1/2" letters.
On the Singer 401 slant shank sewing machine
For Singer, you need this feed cover plate, and I'll explain why below
This attachment -is powered by a fork over the needle bar*
Deluxe Monogrammer attached to machine, with letter cam inserted.
(Obtaining the cams for this monogrammer is THE biggest consideration before you buy one - they were not sold in complete sets so you'll have to collect the letters you want individually which can be costly and time consuming more on that here)
You have a clear plastic guide to show you the placement of your monogram
And here it goes. The attachment actually moves the fabric around to form the letters, so the feed cover gives it a smooth surface to move freely. As you'll see compared the Kenmore version below, this stitches SO much nicer - a plus on the Singer side.
For tiny letters that go on a cuff, collar, or handkerchief maybe, is the monogrammer that looks more like a buttonholer. It comes with a complete set of cams, unlike the Deluxe Monogrammer.
Placement guide to situate your letters
Similar to using a buttonholer, you put the round cam in the top
Now, on to Kenmore. While the monogrammer itself is standard for this series, it comes with an array of throat plate attachments to accommodate the MANY variations of Kenmore 158 machines. This can be frustrating if you didn't get the one that came with your particular machine and are trying to find one on eBay or Etsy. Sometimes guesswork is involved but I lucked out and found one that fits my 1774.
These come with a full set of templates which make BOTH sizes of letters so that is a plus for Kenmore.
*Here is a key difference in how this works compared to the Singer version. This one isn't powered by the needlebar, but evidently the two knobs I have circled here interact to make the attachment move.
Instead of the placement guides, you insert your fabric in this hoop and the gauge underneath will place the letters in the left-center-right positions.
In my opinion the hoop can be a little awkward since depending on where you are placing your monogram you might not have a big enough area to fit easily inside the hoop. But as you can see, the hoop itself is what makes the fabric move so it's not optional.
With this monogrammer, you just turn the cam around and insert it in the opposite direction to get the smaller size letter - unlike the Singer which requires an entirely separate attachment.
So, that about covers it. Like I said, I'm glad I have both since the letters do look different and also come in different sizes.
Kenmore
Pro: Comes with all letter cams for large and small letters
Pro: No separate letter guides needed
Con: Can be hard to find the version with the correct throat plate for your particular machine
Con: Doesn't make as nice of a satin stitch as the Singer
Singer
Pro: Stitching is superior
Pro: Makes 1-1/2" letters if you want a larger size
Con: Must get TWO attachments for the different letter sizes
Con: It is expensive to collect the letter cams for the Deluxe Monogrammer
UPDATE: Just to throw another element into the mix here, there is a Kenmore branded monogrammer for low shank machines - that is IDENTICAL to the Singer Deluxe Monogrammer - that could be purchased separately. It uses the same cams as the Singer so they are interchangeable. Instead of a flower, it came with a clover. This is great to have on hand to use with any of your low shank machines.
I don't only use vintage sewing machines, I also use an "almost" vintage serger (they haven't been available for home use long enough to be truly "vintage" yet, they've only been around since maybe the early 1980s.)
Today's sergers come with an impressive array of features including some kind of air threading which I have literally never seen so I don't miss it. Some of them also have many more threads than the four shown here, and again having never used one of those I don't miss it.
This cost $500 new (probably thirty-odd years ago) and I paid $60 for it on Shop Goodwill. It still works just as good as new!
Kenmore 16641
It sews beautifully, and cost me about the same as a nice restaurant meal. That's a great deal for someone like me who uses a serger only for a few applications and doesn't mind threading it manually. I'm used to doing everything manually on vintage sewing machines so this doesn't faze me at all.
I threaded it up with color-coded threads, and it sewed perfect tensions right out of the gate
Mostly what I use a serger for is to finish fabric edges
It sews nicely even over the thick seams
Then I might use it occasionally to make a rolled hem edge
It sews just as nicely on this delicate Liberty Tana lawn - pretty rolled hem!
And last but not least, I might very occasionally construct a knit garment on the serger
Perfect tensions again, on this super stretchy knit seam
And that's about it! For the money I saved buying a good quality used serger, I can buy more fabric and other goodies. Win/Win.