Frolic

Friday, August 3, 2018

Another Fun Gadget, the Underbraider

This is a gadget that I believe came standard in the attachment set of the older machines - I'm talking about the OLD black Singers from the early 20th century.  At that time, it was probably common to adorn garments with braid, thus the underbraider which attached it from the bobbin-facing side of the fabric, as the name implies.

For this attachment, it doesn't matter which shank type you have, but you do have to have a machine which has the holes in the bed and the throat plate that match up with the slot to screw it on, and the little clamp that holds it in place.  The majority of old Singers have this configuration - this is on my Singer 237.


So what you do is insert braid, or whatever 1/8" embellishment you're using, into the slot:


Another thing you must have is the short, open-toed quilting foot.  A regular straight stitch presser foot won't work because the toes are too long and too close together to allow for the slot that feeds the braid/ribbon.

HOWEVER...

Here's a good thing to know: if you don't have that type of quilting foot available, then you can use your button foot!  That is what I'm using here.  It is almost exactly the same and works perfectly well.


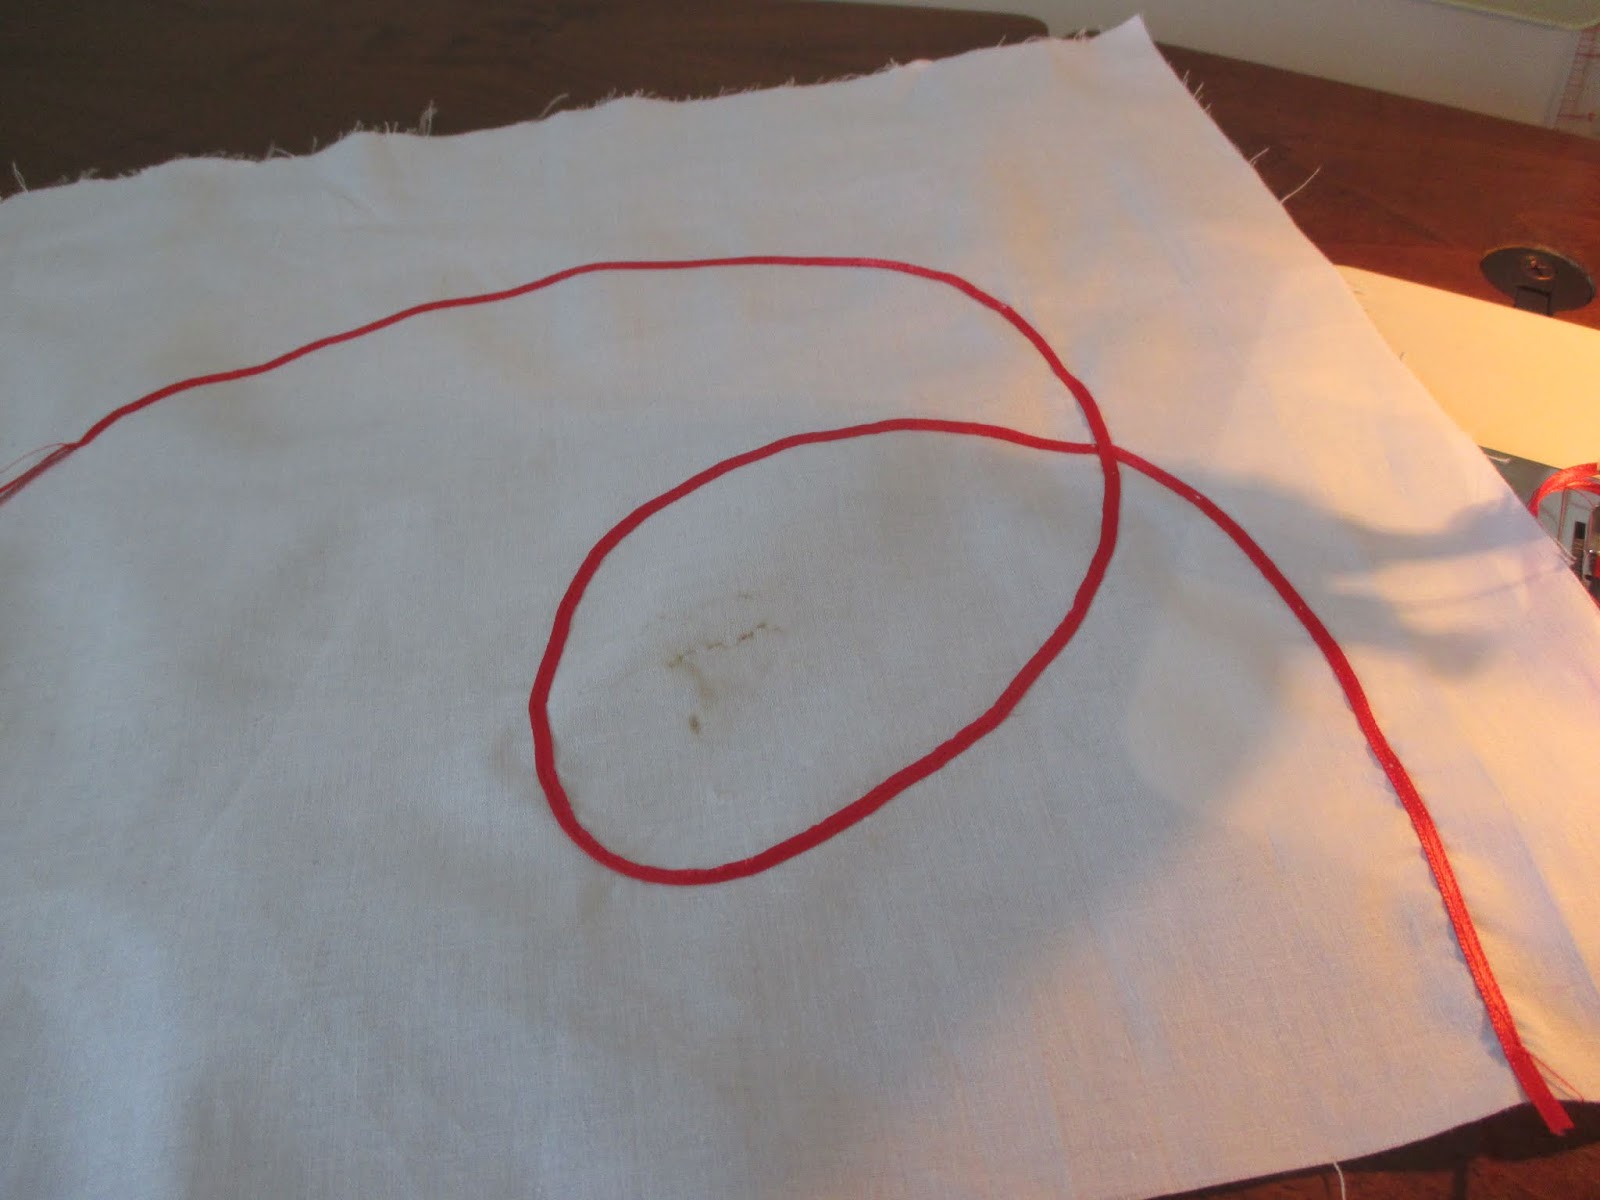
So naturally you match your bobbin thread to the embellishment you are sewing on which is going onto the right side of the fabric which is face down.  If you are following some kind of outline or design, you can sketch that on the back of the fabric which is face up.  Now sew!

Let me take a moment and point out how quietly and smoothly this machine sews.  I like it better each time I use it.   Excellent machine!


And here is the right side  (this fabric sample is an old press cloth so please excuse the scorch marks!)


What I think will be even more useful for me is sewing on tiny rick-rack.  If you are so lucky as to have some vintage baby rick-rack, this is the perfect gadget for sewing it on.  (Modern baby rick-rack isn't as tiny as the older kind, and may not fit.)

I collect vintage rick-rack.  I love this stuff!

So if you are making a hem, for example, and want rick-rack along the hemline, you can do it in one operation from the wrong side.

You can't tell, but this is very tiny rick-rack, just 1/8" wide

The top thread popped through a bit here, so I could have adjusted the tensions.  But you can still get the idea.

This gadget won't necessarily rock your world, but if you happen to find one in an old box of attachments like I did, now you'll know what to do with it.


Sunday, July 15, 2018

Civil War era dress

 Most of this blog is about collecting Singer machines and accessories, but I actually use them, too!  I am not an accomplished seamstress, but such as it is here is my most recent project.

In order to do interpretations at local history venues, I made this "working" dress from the Civil War era.  I am kind of shooting blindly with this, because I don't have a direct source work with, but having found this silhouette to follow, I adapted a pattern to copy it pretty closely


I'll mention that my level of authenticity is probably about a 7/10.  I wanted the cut, style, fabric, and sewing techniques to be as close to the period as I could reasonably meet.  I intended it to be more of a reproduction garment than a costume - so no zippers, for example. (HERE is an example of a costume I was commissioned to make from their choice of pattern and fabric.)  At the same time,  it has to be feasible for me to produce this, so I'm going to take advantage of "shortcuts," with my handy Singer gadgets.

Here's one of them:  The ruffler on my 237 Fashion Mate which did a wonderful job of pleating the skirt.  In just a couple of minutes, nearly four yards of fabric were perfectly, and evenly pleated.


It was probably at least twenty years after the Civil War before anyone would have had a sewing machine at home (a treadle, of course) so this would have all been stitched by hand, including the buttonholes.  In Little Town on the Prairie, Laura Ingalls Wilder described how she made buttonholes by hand:  

It is not easy to space buttonholes exactly the same distance apart and it is very difficult to cut them precisely the right size...  When she had cut the buttonholes, Laura whipped the cut edges swiftly, and swiftly covered them with the small, knotted stitches, all precisely the same length and closely set together.  She so hated making buttonholes that she had learned to do them quickly and get it over with.  

When I considered making my buttonholes by hand - since the stitching would be visible on the garment - I remembered that passage, and I thought nah....  So my 237 cranked them out in a couple of minutes with the Singer Automatic Buttonholer:


And I did fabric covered buttons, which I think looked great with those machine-stitched buttonholes (still need to sew on two more.)


This dress was adapted from Butterick 5831, although I made lots of changes from a full-skirted evening dress in a sheer, drapey fabric to a more practical every day calico work dress with a more fitted bodice.

Don't know if this would pass muster with the most hard-core Civil War reenactors, but for my purposes it will do nicely.

Monday, July 9, 2018

Isn't She Lovely! Sky Blue Singer 338

This machine came along in a different way than most of the others.  I bought it to add a splash of color among my collection of black and beige machines.  Yes, I bought it because it's so PRETTY!


The 338 is a tank of a machine, much like its cousin the 328.  These aren't the sleeky sports cars of the Singer line, but this is your sturdy reliable machine that will do the job with a minimum of fuss.  

FEATURES:

Horizontal oscillating hook with Class 66 drop in bobbin
Three needle positions (you can make 4-step buttonholes)
Takes twin needles
Enclosed bobbin winder
Presser foot pressure adjustment
Easy snap off needle plate - you can use zigzag or straight stitch plates 
Cover plate to bypass feed dogs for darning and embroidery
Unlike the 328, the power cord plugs into the machine (a BIG improvement!)


These are the eight "fashion disc" stitches that originally came with this machine. 
 These are the same cams used on the "Swing Needle" machines like the 306 and 319 - but they are hidden under a cam cover on this machine.  This machine makes a very nice stitch!

And isn't the twin needle stitching pretty, too?


It's a good, solid machine and sews well - and the color is easy on the eyes! 


Monday, May 21, 2018

Singer Stylist 457 - replaced the gear and ready to roll


For the most part this is a solid, metal machine, but it DOES have some nylon gears which are bound to deteriorate after a few decades of use.

Singer Stylist 457


Now, I didn't go out seeking this machine, but it just "found" its way into my sewing room. Sure enough, before I even tried to run it, I opened it up and found this bad boy (on the right) lurking inside.  This is the top gear that turns the vertical shaft that drives the machine.

Gear on the right has crumbled to pieces, but it's worth replacing.

Happily, these gears are still available and only cost about $10 so I was able to replace it.  That's basically all it took to get this machine back into working condition.  Of course I also had to time the hook after I was done, but that isn't as mysterious as it sounds and it worked out fine.  The stitches are fine, nothing special, though.
Adequate stitching, can't complain.

All it does is straight, zigzag, and blind stitch, but for 99% of your sewing that's all you'll ever need.  It has three needle positions, so you can make your four-step buttonholes, and it takes a twin needle so you can hem your knits or even make a little decorative stitching.

In spite of being a rotary hook machine, this isn't the fastest or quietest machine I've ever used, but it gets the job done.  (Surprisingly, the 237 Fashion Mate, a cheaper machine in its day and with a vertical oscillating hook, runs smoother than this one.)

If you happen to come across one of these for a few bucks it might be worth your while to pick it up even knowing that you'll most likely have to replace the top gear.  If you DIY, it's just $10 for the price of the gear and less than an hour of your time.

I don't need more sewing machines around the house, but it is kinda cool to be able to "rescue" them from a thrift store where people just chuck their old machines that no longer work.  Bringing them back to life so they can be used again is very rewarding.

PS... I sold it  :)

Sunday, April 8, 2018

Singer Automatic Zigzagger Stitch Patterns


I have covered the Automatic Zigzagger before, but since lots of people have been talking about it lately, I thought I'd show all the pattern stitches.  Anyone searching for info on these might like to see how they look, all stitched out.

To recap, there are four sets of four cams as follows:
  • Set #1 - RED cams that come with the zigzagger
  • Set #2 - RED or WHITE cams (they are the same patterns, but the later ones were painted white to differentiate them from the red Set #1)
  • Set #3 - BLUE cams
  • Set #4 - YELLOW cams


 The second stitch from the top isn't attractive, but it is useful as a blind stitch.  I show how it is used HERE.


So here you have it, all SIXTEEN different stitch patterns you can make with your Singer Automatic Zigzagger on any straight stitch sewing machine.  And they don't look half bad. 


Sunday, March 18, 2018

Stretch Stitching on Singer Slant-O-Matic

In response to some buzz on a VSSM group, I dug out my "stretch stitching"* equipment for my 401 and tested it out. 

The fabric I used for the experiment was this.  Slinky and drapey, and with a substantial stretch in both directions (about 50%.)


The machine I used was my 401


And the stretch stitching "equipment" is this:

Now, I don't have this cute little plastic case for mine, I bought the foot and cam separately.  If you're looking for the same thing, it is the #22 cam (which looks like an inverted #8) and an overedge foot.  That's all it is. (This same combo is great for finishing seams with an overedge stitch.)

I used a Schmetz stretch needle and Guttermann 100% polyester thread.  And here are the results.  This stitched perfectly, no skipped stitches, no puckering, and I can stretch the seam without breaking any stitches.  Remember, the 401 doesn't have a built-in "back and forth" stretch stitch, so this is how it was done on a forward stitching machine.

This is how the stitch looks


Here is the front side


Now for hemming that stretchy knit with a twin needle.  My new best friend is Wonder Tape.  You don't want to try to press up or pin up this hem, but of course you want it to stay in place without shifting.  So you use this helpful product.

Tape it down with the bottom edge where you want your hem to be.


 Then you peel the paper backing off


and turn up your hem and press it into place


Now stitch with a twin needle and very light upper tension.  For best results, use a backing like tear-away or wash-away stabilizer, or even tissue paper like I'm using here.


I did NOT use a stretch twin needle, just a universal.  Results might be even better with a stretch needle, though.  Anyway, between the Wonder Tape and the paper backing, there was no shifting or puckering of the fabric.


PS...  The 401 takes two separate needles, so if you don't have a stretch twin needle you can use two stretch needles in there instead.  I didn't think of that until after I did this.


*Keep in mind that this is a FORWARD ONLY "stretch stitch."  By that I mean that it isn't the kind of true stretch stitch made by later machines in which the stitch is made by a forward/reverse stitching motion.  Those kind of machines build the stretch right into the stitch and are the gold standard for stretch stitching.  Keep in mind that this is the only the best method for a forward stitch pattern.

Saturday, March 17, 2018

Fun with Singer Bias Cutter and Bias Binder

Here are a couple of really cool gadgets from the Singer Tool Box.  Top is the bias binder, and below its the bias gauge cutter.

Now imagine it is 1955, and we are going to cut and apply a bias edging.  First we have to cut the bias strips 15/16" to fit the binder attachment and we do it with this little device.


Before I go any further - Yes, I know there is a method where you can cut continuous bias strips after marking cutting lines and making a couple of seams in a bias cut piece of fabric.  I do that myself sometimes.  But for the fun of it, let's just assume we only need a short bias strip so we're going to cut and seam it the old-fashioned way.

First I'll mark off my first bias line, and cut it.

(And yes, I "cheated" and used the rotary cutter for the first line.)


Now I don't have to mark off any more lines to get perfectly even strips.  I just attach this gizmo to the tip of my scissors and cut.


That little square next to the B is where you set the gauge for how wide you want your strips to be.
F = facing,  B = binding, C = cording.  I have it on B to get the required 15/16" inch strips that work in the binding attachment.

You attach it to the tip of your scissors as shown above, then you insert the edge of the fabric in the slot and start cutting - the strips come out perfect!

(If you have a good eye, you'll see I had the gauge set a tad past the B so my strip is a full inch wide. Oops!)


To seam, line up your strips this way.  Then press the seam open and cut off the little points.


So now you put your strip into the largest slot on your bias binder, then attach it to the machine. (It is easier to do it that way.) Feed the edge of your fabric into the slot between folds and sew.


The binding attachment folds and sews it on in one step!


How cool is that?

A Guide to Some of the Most Popular Vintage Singer Sewing Machines PART II - The Slant-O-Matics


CONTINUED FROM PART I - The Classic Blacks.

Introduced by the revolutionary new slant shank 301 came the parade of Slant-O-Matics in the early 1960s.  Low shanks were still made at the same time (the Style-O-Matic and Fashion Mate lines, for example) but the Slant-O-Matics were Top of the Line and are the ones most people are interested in obtaining today.  With one exception, these were zigzag machines.


Singer 404 Slant-O-Matic


Singer 403 Slant-O-Matic


Singer 401 Slant-O-Matic


Singer 503 Rocketeer


Singer 500 Rocketeer


NOTE:  All the Slant-O-Matics shown here (except the 404) use top hat cams which are interchangeable.  There are 23 total that work on these machine numbered #0-#22.  Usually 6-8 of them came with the machines when new and may or may not be included with a used machine.   These, for example, are sold separately.

#22, stretch or overcast
#17, curlicue


You can often find a set of these on eBay that come in a box like this (for a 600 machine.)


MORE INFO ABOUT THE 400 MACHINES AND THE CAM SYSTEM HERE

MORE INFO ABOUT THE "NEXT GENERATION" OF SLANT-O-MATICS, THE 600 MACHINES, HERE