Frolic

Friday, December 15, 2023

The Reluctant Quilter Part II - basting, quilting, binding

Continued from The Reluctant Quilter Part I - Piecing the Top 

It doesn't take long to figure out one thing about quilting - piecing the top is the "fun" part.  Well, "fun" if you enjoy cutting out dozens (or hundreds!) of tiny pieces to exact precision, then sewing them together with 1/4" seams to exact precision.  

But it is "fun" and comparatively easy since you are working on small sections at a time.  

Then comes the WORK.  I watched a number of videos about quilt basting methods and finally decided to pin it on the carpeted floor (no pool noodles, ping pong tables, quilting frames or basting spray for me.) 

I pinned the backing onto the carpet with T-pins rather than taping it to a hardwood floor


 Batting hasn't been totally smoothed out yet, but this is the next step


Then the quilt top.  I used 200 safety pins to baste it.  It actually wasn't as bad as I imagined. 


On to the quilting itself.  THIS is the challenge.  Yes, I know at this point you can take it to a quilt shop and they will quilt it on a long arm machine with beautiful fancy patterns.  But 1. that is costly, and 2. the whole point of making a quilt is making it myself.

This is the first of what will be MANY lines of stitching.  I am lucky enough to have a SHS walking foot for my favorite Kenmore 1760, and so off I go.  

I used a three-step zigzag stitch to make vertical and horizontal lines across all the squares which are set on the diagonal.  Then I came back and did a straight stitch in the ditch along the diagonal row seams. 

Yeah, I know you need to roll up the quilt so it goes through the machine more easily, but I got tired of rerolling it every time I started a new line.  Too bad I didn't know about THIS product until after I was finished!  


And I'm sorry, CAT PICTURE!  It doesn't make it any easier to wrangle that quilt through the machine when a cat decides it is a cozy spot to sit and look out the window.


I chose NOT to quilt the border, BTW, in spite of being advised to do so.  It is only 3" and I didn't think all those random lines going across in different directions would look good on the border. 

Not perfect, but I got the job done


I pieced my binding from fat eighths, so it is multi-patterned.  I did run the edges through the serger to keep it all neat (I tore the strips rather than cut them - don't ask!) and I only had to undo a few inches on the ends in order to do the final join. 

I did the method where you first sew the binding to the BACK of the quilt


And then turn it to the front and machine stitch it down.  I have no time or patience to hand stitch a binding.  No way/No how.


Here's how it looks front and back, almost the same.  2-1/2" binding strips, and I sewed with a 3/8" seam


This is shown on a queen sized bed


.

PS... This quilt has been Kitty Approved


Monday, December 4, 2023

The Reluctant Quilter - Part I, Piecing the Top

 I have been sewing for more years than I want to admit, and yet I have never made a quilt.  I never WANTED to make a quilt, it just isn't my jam for lots of reasons.

But when a seven year old granddaughter asks you to make her a quilt, then that is what you do.

I looked for a pattern that was 1. FREE and 2. EASY because I have zero patience for anything that requires cutting out hundreds of miniscule pieces of fabric only to reassemble them into an intricate design.  


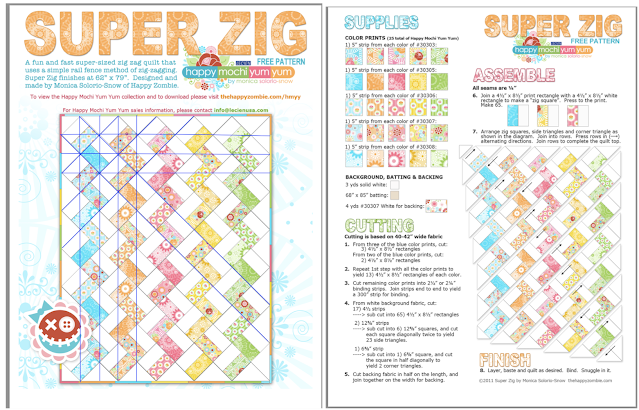
This is what I chose, but with different fabrics since this collection was no longer available. (The blue lines are how I intend to quilt it)

This looked "easy" because all the squares are the same, two rectangles sewn together. Super simple!

I bought a fat eighth bundle, and cut out 65 printed rectangles.  Since each had to have a matching white rectangle, I figured the easier way to cut those out...
I laid the rectangles out on the background yardage, sewed the seams, then cut them out.  I'll dub this the Cookie Cutter Method. (I know nothing about quilting, this might already be a thing!)  Anyway, this was much faster than cutting out individual rectangles from the yardage, then matching them up to each printed piece.

Then I laid out the blocks to see how it goes together

There are twelve diagonal rows, so once I laid it out, I picked up the pieces of each row in the order to be sewn, and numbered each pile.  Then I stacked up the piles and started sewing the blocks into strips, then the strips into rows

Really, that is all there is to it, and it took a couple of days to sew the top

 I added a 3" border to tie it all together...


I have already cut and pieced my backing and binding. 
Ten yards of binding pieced from fat eighths.

Something tells me that the hardest part is yet to come...the basting and quilting.