Frolic

Friday, December 15, 2017

Singer Toy Lockstitch Sewing Machine

So back in the day, Singer even made a half-way decent toy sewing machine, a real LOCKSTITCH sewing machine:


This one has an actual bobbin
That is a shuttle type bobbin


And even a bobbin winder


It has a foot pedal and comes in a carrying case


Of course this a 100% toy, and not meant to actually sew much more than two pieces of cloth together.  But I would have LOVED to have had this when I was ten years old.  I used to sew clothes for my Barbies back then - by hand - and I was so proud of them.  I would have been beside myself to have a little machine that could do very basic stitching.


And here is how it works


It makes a perfectly nice, even stitch which is a full lockstitch and will actually hold the fabric together.


You can buy pretty cute toy sewing machines nowadays like this:
Super cute, yes, but it makes a chain stitch which is less than worthless.  Most toy sewing machines you can buy now, no matter how fancy they seem with all the gadgets and accessories, make a chain stitch.  It makes me mad whenever I see those chainstitch machines advertised as being something you can "make" things with.  The only thing you will ever make with one of those is a mess!

Tuesday, December 12, 2017

A Word You'll Never Hear Me Say (About Sewing Machines)

Very short and quick post here.

From 1960:


I like to read sewing machine reviews - of all kinds of machines, not just vintage - and it has become a game where I am waiting for the inevitable description of any given machine as a "workhorse."  I'm getting tired of this same old/same old description.  Every machine is described a "workhorse," so it doesn't even mean anything.

THIS is a workhorse


THIS is a sewing machine
I'm ready to hear some lively new words to describe sewing machines because this one's been done to death.

I assure anyone who reads this blog that I will never refer to a machine by that term.  I'll come up with other descriptive words for sturdy, heavy-duty sewing machines but that is one you will never hear me say.


Monday, December 11, 2017

Singer 328k Style-o-Matic


Here's something a little different from the usual parade of Slant-o-Matics I've reviewed lately, and it goes to show that looks can be deceiving.  At first glance, this doesn't look a whole lot different than one of the 400 machines, but this is a different machine entirely. (Although they riffed off the name, calling this a "Style-o-Matic.")


This is from the early 1960s, and was the budget model compared to the TOL Slant-O-Matics.  That is not to say this isn't a good machine - it is - but for different purposes.  This was an affordable machine without a lot of pizzaz compared to it's higher-end cousins in the SOM line, but in all ways a very serviceable machine.  

Singer 328k takes flat cams 

 Rather than built in stitches, zigzag and other decorative stitches are made with cams.  These are flat discs instead of the top hat cams that go in the 403 and 503.


A low-budget feature is the power cord that is hard-wired into the machine rather than plugged into a terminal.  There is also no on/off switch for the light.  So there is no way around it, you must crawl down on the floor to plug/unplug this machine every time you use it.

feed dog disengagement system

The feed dogs can be disengaged with the flat black plate shown above, which means removing the throat plate and inserting this underneath.  This raises up the throat plate just enough to bypass the feed dogs.  It is a similar concept to the "elevated throat plate" system on TOL Singers - except you have to do this manually.

The typical accessories

This machine has an oscillating hook, and also has a belt (running off an enclosed motor) rather than a direct gear drive.  However, it runs surprisingly smoothly for all that.  It is a solid beast of a machine, and there are no complaints on stitch quality


 This isn't going to be your "fun" machine - it won't make your vintage loving heart sing. It's not a collector's item.  But it is utilitarian, it is solid, and it works perfectly.


Wednesday, November 29, 2017

Who Buys My Machines?

Yesterday I both bought and sold a vintage Singer. It's just a hobby for me, not really much profit to be had (the profits roll right back into the hobby fund.)  In the last five or six years I've sold a couple dozen of them, I guess, and I always sew at least one project on each machine before it goes to its new home.  That is the fun part to me - discovering machines that haven't been used for years, and putting them back into circulation.

I started thinking about who buys these old Singers from me, and why.

I'll start with the obvious: the Featherweights.  I've lost track of how many of these I've sold, but it's not hard to see why.  They are both useful AND collectible.


I've sold beautiful ones,and shabby ones,

and many more in between.  Some are for Show and some are for Sew.  I'll say this, Featherweights sell themselves.  I list, they buy.  With one exception, I've sold all these on eBay.  They are the only machines that are light and compact enough to ship easily.


I've sold most of my Singers through word of mouth or on Craigslist.  I've lost track of them all, but here are some examples:

I've sold a number of 15-91s, including this one.  One of these was bought by a local clothing designer who wanted a sturdy, reliable machine for his studio.  

Singer 15-91

He was a repeat customer, having previously bought this 201 from me.  He loved it so much he wanted another one like it.
Singer 201

These machines have different configurations (vertical/oscillating hook versus horizontal/rotary hook) but they are both fine machines, well suited to garment construction.


One machine that was a little different from my usual line up was a Singer Stylist free-arm machine like this:
Singer Stylist (not the actual one I sold)
I remember this one, especially, because I paid only $5 for it and then I replaced the worn-out nylon gears and reset the hook timing - yes, I did it myself!  Unbelievably, I was not only able to purchase the gear set online for $25, but I found a DIY video showing the exact same model, step-by-step how to do it. (I mainly did this for the experience - just to see if I could.)  It ran perfectly after that and I sold it for a whopping $75. The young man who bought it wanted it specifically to sew a sail. I never heard how it turned out, but I do know that he got a good value compared to the "Bucket-o-Plastic" machine he could afford to buy at WalMart.


Of course I've sold several Slant-o-Matics.  They are in big demand, and many buyers mention that their grandmother sewed on such a machine and now they want one.  One customer does custom home dec sewing like drapery and upholstery, and she specifically wants these machines because they can meet the demand for heavier sewing.  (I'm not implying these are industrial strength machines, by any means, but compared to modern domestic sewing machines they are beasts.)

Singer 503
Singer 403


Along the way, I've also sold scores of accessories and attachments like zigzaggers, buttonholers, hemstitchers, presser feet, bobbins, manuals, and even cabinets.  These are items that usually "come along for the ride" when I buy a machine.  Believe me, there is nothing I love more than opening the drawers of an old sewing cabinet or lifting the lid of a sewing stool.  Treasures to be found!  

Singer Automatic Zigzagger

Singer Automatic Buttonholer

This is all in fun, and as long as I break even it's a sustainable hobby that also helps provide new homes to these great machines that have many more years of good service to give.

UPDATE:  April 2022, five years later...

Gosh, how many sewing machines have I sold?  Maybe a hundred?  I can't even guess.  Just this year, I think I've sold five already.  Don't mean to brag here (okay, well maybe I do - it's my blog, so I can brag!) but I've sold every single machine I ever listed for the price I asked. EVERY. SINGLE. ONE.

Soon, I'll add a post on tips to sell sewing machines...


Tuesday, November 28, 2017

The Coveted 301 Longbed with Carrying Case

And it didn't cost me a cent!

Singer 301a long bed

So, here's how I got it:  I bought the 403 shown in this post for $50, I sold it for $100, then I bought this 301 for $50.  In fact, if you look at the blog photo of all my machines, that entire collection (including all the accessories) hasn't set me back one cent.  For every machine or gadget I own, I've sold at least four others which replenishes my hobby fund.

If you're so inclined, you can do this with almost anything you collect.  It simply takes time and patience, and you have to enjoy the process of hunting for the next great find, dragging it home, fixing it up, and selling it.  I do enjoy that since there is always another model I want to acquire, even if it is only passing through.

Of course I already have the 301 black short bed in a cabinet
Singer 301 short bed
These are two variations of the exact same machine.  The "bed" is the extension leaf that folds up and down so you can access the vertical bobbin case under the machine (the Featherweight has this, too.)  The long bed, like this beige one, won't fit into a standard cabinet and usually comes with the carrying case.  The short bed, like this black one, fits into certain Singer cabinets with a cradle adaptor.  This means it can be easily removed from the cabinet - you don't have to unscrew anything - and used as a portable. (This post shows how the cradle adaptor fits into the cabinet.)

Keep in mind that you can also get the short bed in beige or the long bed in black.  The black is usually considered more "collectible" mainly because it is the last of the beautiful black Singers with the glossy gold decals.  The beige 301 ushered in the color scheme that would be seen in the 400 and 500 Slant-o-Matics.  Apparently this was supposed to be a more "modern" style, but they just didn't have the same glamour as the classic black and gold models.


Not that Singer didn't try to cash in on vintage appeal with their anniversary edition 160 a couple of years ago (the less said about this cheap, plastic imitation, the better.)


        So, back to the 301.  

I've raved about them before, and I have to say that this is the hands down best machine of ALL the many vintage Singers I've owned.  The other Slant-o-Matics are good, don't get me wrong, but the 301 is not only the original Slant-o-Matic, it is the only one with the vertical bobbin.  And this machine runs like greased lightning - 1500+ stitches per minute.  I'm pretty sure that beats any but the most expensive home machine you can buy today, and you can cop one of these for $100 or less.

The carrying case is also exceptionally cool and this one is in very nice condition.


And it came with SIX original Class 221 bobbins.


Hey, those original bobbins are worth $2-$3 apiece, maybe more.  They are hard to find, and I never use reproduction bobbins in my vintage Singers.

I don't know how long this machine will be around, but since I broke even, I'm not in any hurry to sell it.  I think I'll just enjoy it for awhile before I decide.


Tuesday, November 14, 2017

Singer 401 versus 403 (and 404)


This was something I used to wonder about - the differences between Singer 401, 403, and 404
Slant-o-Matics.  In the past year, I have acquired each of these machines and can now explain it to anyone else who is wondering.

I already covered the 404 in another post:  it is a basic, but excellent straight stitcher.  It is easy to use, practically indestructible, and fool proof.  There is nothing fancy here, just great stitching.

Singer 404 (straight stitch)


Here I will explain the difference between the 401 and 403

Singer 403 "Semi-Automatic" 

Singer 401 "Automatic"


The difference basically comes down to this.  The 403 is "semi-automatic" because it zigzags only with a cam in place (it is shown here with the "0" cam that makes the zz stitch.)  Other decorative stitches can be made by popping this cam out and substituting one of the other 22 top hat cams that are available.  This is pretty simple, and straightforward - choose your stitch pattern and pop it in.  You choose your stitch width and needle position as usual.
Singer 403 takes one cam at a time


Then you have the 401.  It is considered "automatic" because the zigzag stitch is built-in via a camstack.  This also includes a number of other fashion stitches which you arrive at by a somewhat complicated system of turning two lettered dials to get your stitch pattern.  To add to the confusion,  it also takes top hat cams to make different "combination" stitches.  (I explain that in a little more detail here.)

Singer 401 with camstack, plus takes extra cam for "combination" stitches

In all other respects, these machines are identical.  They both have horizontal (drop-in) bobbin with rotary hook, dual spool pins and dual upper tension for twin needle stitching, three needle positions, the elevated throat plate system, bobbin winder on the side, and a flip top for cam placement.


Here is a handy chart showing the 401 vs 403 stitch patterns


Now the 401 is known as the TOL (top of the line) machine for this series.  Supposedly because you had built-in stitches, this was the better machine.   

However...

If you mostly just straight stitch and zigzag - and only occasionally use any kind of decorative stitch  - then I think the 403 is actually better because it is easier to use.  With the 401 you have to dial in the combination AK3 to straight-stitch, and to zigzag you have to dial in BL + stitch width.  With the 403 you just move your stitch width lever to "S" to straight stitch, and to whatever stitch width you want for zigzag.  Easier!  And honestly, by the time you figure out which combination of dials gives you a certain decorative stitch on the 401, you could have just popped a cam into the 403 and been on your way.

While the 401 is considered by many to be the gold standard among Slant-o-Matics, just know that the stitch quality and speed are identical to the 403.  (The camstack is literally the only difference between the two.)

I love to make little videos of my machines stitching so here is a side-by-side comparison. (The 403 sounds a tad louder because it is sitting on a table while the 401 is installed in a cabinet which absorbs some of the sound.)


Singer 403


Singer 401


The stitch quality is also exactly the same, the two are indistinguishable (403 = blue/401 = red)


(NOTE:  the difference between the 500 and 503 Rocketeers is basically the same as the 401 and 403 - one has a built-in camstack and the other requires a cam to zigzag .)


Sunday, June 25, 2017

A Train Case for Train Trip

In August, I am off on a new adventure which is a cross country train trip on Amtrak.  This will be a round trip from Atlanta to Washington DC to Chicago to Denver.   That is three nights going and three nights coming back - six nights on a train!  We got the Roomette, which is a small compartment with two large seats during the day, and an upper and lower berth at night.


Can't wait!


So in this month's issue of Sew News  (June/July 2017) I saw a Sew-Along for train cases, and of course what could be more perfect for my trip?  

I was a little disappointed that in addition to buying the magazine, I also had to pay $9 for the pattern online. Then I spent another $21 on fabric, zipper, interfacings, fleece batting, and Fuse-N-Shape. Therefore this HOMEMADE bag cost me $30.  So I'm not saying its a bargain because I could have bought a nice case for much less than that.

Oh well...

Here is where the pattern is available:  Crimson and Clover Train Case Pattern

And here is my finished (medium size) case

And yes, I failed to think it through when cutting it out and cut the print SIDEWAYS.  (I was intent on making sure I cut the top piece and handle just-so, so that I could highlight the "Paris"on the print, and never paid attention to the rest of it.)


Although I've made lots of bags of different types, I wouldn't say this was the easiest one I ever put together.  By the last few steps, you are sewing together so many layers that you can barely fit it under your presser foot.  Fortunately I have my heavy-duty mechanical Singers to do the job, but I imagine some lower end new machines couldn't hope to sew those thick seams.

I thought it was cool to find this pattern for a train case right before embarking on a real train trip.  Yeah, I could have bought a similar cosmetic case for $10 less, but then I wouldn't have had the fun of messing up my sewing room to make this!

Wednesday, May 10, 2017

Video: Rural Family in the 1950s Buys Mom a Singer Sewing Machine


You never know where a vintage Singer sewing machine might show up!  In this video, a family living in rural Georgia makes their living by cutting wood.  The two sons work with their father every day cutting trees and they decide that if they get a power saw they can cut three times faster.  The whole family decides to sacrifice and save the $350 to buy the saw.

On a trip into town one day, the family drives by a house where a neighbor is on the front porch sewing with her Singer sewing machine that was the "envy of all the womenfolk."

0:36:41

Later, in town, the mother looks longingly at a Singer in a store window that costs $95.

0:38:42

As the story continues, the family works hard all summer and saves every cent to buy the saw.  When they finally get it, they are able to make three times as much money and can now paint their house and buy other luxuries.  The film ends with dad and the sons presenting mom with her coveted Singer, and they had "never seen her happier."

1:01:02

She is shown excitedly setting up her machine, opening the box of attachments, and reading the instruction book.

1:02:40

This video wasn't about Singer sewing machines, it was a film about a rural family working together and sacrificing for the things they wanted.  But at the end, it was so cool to see the mom finally get the machine she'd had her heart set on.

Thursday, April 6, 2017

How to Make a Cover for your Featherweight Case

Finally, here is my pattern for making a cover for your Featherweight case. This does not enclose the case at the bottom, but just covers it to protect it from dust, scratches, and scuffs.
This fits the newer style case from about the 1950s.  The older ones, with the tray insert, have slightly different dimensions, so substitute your own measurements if necessary

These are the basic materials - a yard each of a main and contrast/lining fabric plus fusible fleece.  I don't show the piping here, but add that in as well as any other trims (rick rack, appliqué, or whatever) you want.


From the lining/contrast fabric:

Front/Back:  cut 2 @ 15-3/4" x 13-1/8"

Sides: cut 2 @ 9-1/4" x 13-1/8"

Top:  cut 1 @ 15-3/4" x 9-1/4"


From the main fabric and the fusible fleece:

Front/Back:  cut 2 @ 15-3/4" x 11-5/8"

Sides: cut 2 @ 9-1/4" x 11-5/8"

Top:  cut 1 @ 15-3/4" x 9-1/4"


Trim away 1/2" seam allowance before fusing the fleece in order to reduce bulk in the seams.  (NOTE: There is no seam allowance at the bottom of the Front, Back, and Sides.)

Now cut out a 6-1/2" x 1" rectangle from the center of each Top piece as shown:

On each piece, mark the corners with small dots at the seam allowance as shown.  NOTE: Seam allowance is 1/2"


Mark dots on corners at seam allowance (1/2" x 1/2")

To Sew

With Main fabric, sew Front and Back to Sides, stopping exactly on dots, and back stitch to reinforce. Press seams open.

Using the top cut from Contrast fabric, pin to the Sides, matching dots.  Begin and end seam exactly on the dots, and backstitch to reinforce.  These should meet at a perfect right angle, as shown below.


After Top is sewn at both Sides, pin it along Front/Back edges, folding back the seam allowance from the previous seams and matching dots.  Begin and end these seams exactly on the dots, reinforcing with backstitching as before.
Fold back previous seam allowance 

Here is how your corners will look when finished

You can slip this on over the case to help you shape it and lightly press the seams open (Careful, don't scorch your case!)  Trim corners, if you want, to make a neater finish.

Sew Lining in the same way with remaining pieces, then press under 1/2" on bottom edge.

Now, put the Main cover back on the case right side up and the Lining over it right side down (right sides together, in other words).  Match the openings and pin as shown

Sew around this opening about 1/4" from opening edge.  I used the wide toe of my presser foot as the guide.  (You have to turn it inside out to get in there to sew)  Reinforce at the corners as you turn.

Slash right up to the stitching at the corners and trim

Pull the lining through the opening, then you can put this back on the case to press it. (Again, not too hot, you don't want to damage the leather of your case!)  After pressing, topstitch around opening.                            

With cover on the case pull Lining down tautly all around.  It will extend 1-1/2" beyond the bottom (with 1/2" previously pressed under.)  Turn this back up over the exterior and pin into place all around, matching corners first.
Insert piping between the layers and sew the reverse hem with a zipper foot.

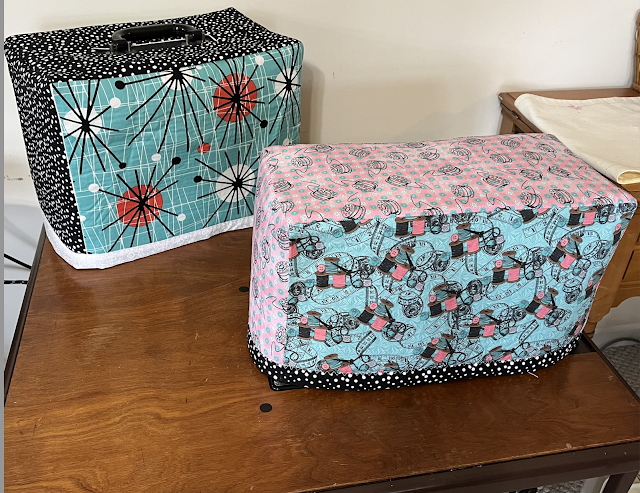
And here is a variation of the Case Cover, which is a Machine Cover (or Cozy) to cover your Featherweight while it's not in use.
Case Cover and Machine Cover 

The instructions are exactly as for the Case Cover except to substitute the following measurements (and of course, you leave off the opening for the handle):

FINISHED SIZE:  16" long X 8.5" high X 7.5" wide

Exterior Fabric:

Top - 17" X 8.5"
Front/Back - 2@ 17" X 9.5"
Sides - 2@ 8.5" x 9.5"

Lining Fabric:

Top - 17" X 8.5"
Front/Back - 2@ 17" X 11"
Sides - 2@ 8.5" X 11" 

OPTIONAL:  To give the machine cover more structure I interlined it with flexible foam.  After sewing the Exterior together, I cut pieces of foam to fit each of the top, sides, front/back sections (use finished size measurements) then used spray adhesive to glue them into place before inserting the lining.

That's it!  If you make this, I'd love for you to send me a photo.