Frolic

Sunday, February 20, 2022

How to Make a Strap for Purses

How To Make a Purse Strap and Add Hardware

  • First of all, decide the finished width you want, keeping in mind the hardware you'll be using which is usually D-rings, swivel clasps and possibly a slide buckle
  • Examples: A small clutch or crossbody bag will often have a 1/2" strap, a medium sized purse or tote would have a 3/4"- 1" strap, and guitar strap might be 2" wide.  

Purse with 3/4" strap

CUTTING THE WIDTH

The width of your fabric will be FOUR TIMES the finished width.  In the example below, for a 1/2" strap you would start with a 2" wide piece

CUTTING THE LENGTH

  • The length will depend on your pattern but keep this in mind:  The easiest way to "cut" a long length for a strap is to tear the fabric across the WOF (width of fabric.)  Many fabrics come in a 44" width which turns out to be the perfect length for an adjustable strap for a crossbody bag.
  • Another advantage to cutting/tearing it this way is that both short edges (ends of strap) will be on a selvedge so you won't have to worry about finishing or folding them under to conceal raw edges.

Top stitch along both edges

  • Once you cut your fabric to the correct width/length, you'll want to interface it.  Choose the weight of your interfacing to suit your fabric, since you want the strap to be sturdy and stable - you don't want it to stretch out from the weight of the bag you're carrying.  (However, if you're using a very sturdy canvas, faux leather, cork, etc. you might not need any interfacing at all.)  
  • Then, as shown above, it is as simple as folding in the long edges to meet in the center - press - then folding it in half and press again.  
  • Now top stitch 1/8"-1/4" along each edge depending on total width.  

ADDING THE HARDWARE

1.  If using a slide buckle, insert end of strap into the buckle, then turn it over the middle bar and stitch it into place

2.  Now slide one of your swivel clasps onto the other end of the strap and slide it on down to the middle 

3. Take the free end of the strap and thread it onto the buckle - it will go OVER the end of the strap that is already sewn on - and pull this on through until you have about 10" of strap doubled up.*

4.  Sew the other swivel clasp to the free end of the strap as shown.


If you're not using a slide buckle, you simple sew your two clasps on each end.  You can add a little rivet for a nice touch.


*NOTE:  If you're making d-ring tabs on your purse, you can cut off a 4"-6" length of your strap to make the tabs.   

Tuesday, February 15, 2022

Kenmore 158.17741 - It's The Bomb

As I've branched out into vintage Kenmore machines in the last couple of years, many models have come and gone.  Some I didn't even bother to review, I just dusted them off and passed them on. 

But after cycling through a number of Kenmores of various configurations I can tentatively say I have found the WINNER.  (And if this changes, I will certainly come back and update!)

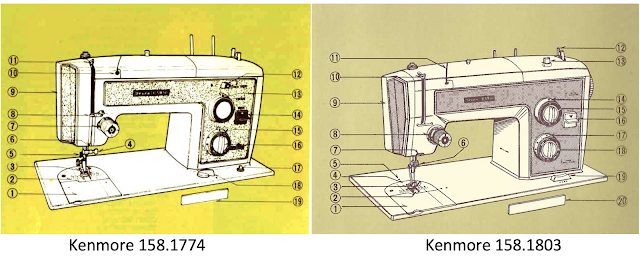
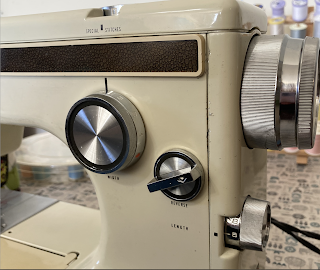
Kenmore 158.17741

Before I cover the features of this machine, it is worth noting that one of the TOL Kenmores of this era was the 1803.  And while I've never seen one of these machines in person, from what I gather this is very similar except for a few minor things such light switches and location of the spool pins.  However, the 1803 is super high shank and the 1774 is low shank. 

(I'm not sure, but possibly the 1774 has more built-in stitches since it has both white and green "special" stitches.) 

As of now - with all the machines I've owned past and present - this is my Number One Go-To machine.  It has the most extensive set of features and most powerful motor of any machine I own.  

FEATURES:
  • Low shank/center homing 
  • Vertical oscillating hook/Class 15
  • Twin needles
  • Feed dog drop
  • Reversible straight stitch/zigzag needle plate
  • Presser foot pressure adjustment
  • Extra high presser foot lift
  • Slot threading
  • Built-in stretch stitches
  • Takes C-cams/double cams (reverse stitch patterns)
  • Easy "pop-out" clutch release 
  • Powerful 1.2 amp motor
  • 1000+ spm 
AND...

And to top it all off, my machine came in this cabinet that opens out to a whopping 62" of workspace, plus three drawers.  This is a full-on Sewing Center with everything I need.

Here is the most recent project I sewed on this machine.  I make a lot of bags, and bags have a lot of layers and some thick seams.  I never heard one peep out of this machine as it soldiered through whatever I asked it to sew.

Pattern by Bagstock Designs

So while I'll always be partial to vintage Singers for the nostalgia value and its serious pizazz,  I have to confess that when I actually sit down to SEW, this is the machine I turn to 9 times out of 10.


Friday, February 4, 2022

Reclaimed Stitches


No two are the same, because all items are fabricated from various remnants and recycled materials including vintage fabrics, trims, buttons, and zippers.  (New fabrics and hardware are used as needed!)  Most - but not all - of the patterns are my own design.


These are made with jellyroll strips but could be adapted to any assorted fabric remnants you have on hand.

Another bag from the same jellyroll, plus vintage button, upcycled snap and zipper


                                   Tote bag made with pre-cut strip pieced exterior/canvas interior


                                        Tried a little something with an old bandanna


From a $4 pair of thrift store jeans


The floral print is a favorite vintage piece.  All the zippers are upcycled.  


Another $4 pair of jeans


This is a favorite pattern of my own

zipper and yellow fabric are from estate sales, pink daisy fabric is from a fat quarter


Fabric remnants from thrift store above and below


fabric remnant from Etsy


fabric remnant from Marketplace (I was inspired by the "Daphne" bag from the show Frasier.) 

Had enough left over for this

 
Found this remnant in an antique mall, it's a real vintage piece. Zippers are upcycled, too.


fabric remnants from estate sale, upcycled zippers inside


All new fabrics here - just because sometimes you can't help it! 


Vintage fabric from estate sale plus upcycled zippers  (It's stuffed with fiberfill for the photo)


Tuesday, February 1, 2022

Kenmore 158.1050 and 158.1030 - The "Mini Kennies"

Kenmore 158.1050

Kenmore 158.1030

The Kenmore "Mini Kennies" are 3/4 size machines with a lightweight aluminum body and compact plastic carrying case.  They can do almost anything the full-sized 1970s Kenmore counterpart can do (except take cams for decorative stitches.)

These machines are from a series of 158.10XX mini portable machines in the Kenmore lineup -  these include the 158.1020/30/40/45/50/60.  

I love the iconic rose-embossed carrying case!

The 1050, being the later model, has the most features (the 1060 is a free-arm, so slightly different from the rest, and doesn't fit in the cute little plastic case.) 

This super-duper little Kennie packs a lot of features into its 16 pounds!
  • Low shank
  • Vertical oscillating hook/Class 15 bobbins
  • Presser foot pressure adjustment
  • Extra high presser foot lift
  • Pop out clutch
  • Feed dog drop
  • Easy slot threading system
  • Nine built-in stitches, including reverse pattern stretch stitches
  • Built-in buttonhole stitch
  • Snap in straight stitch/zigzag throat plates
  • Flip up bed extension, similar to Singer 221 and 301
  • Integrated accessory box which flips out to add extra working surface
  • Streamlined design with recessed tension unit and retractable spool pin
  • .8 amp motor
Extended work surface with flip out extensions


This is very easy to thread: you bring the thread through this groove on the top, then straight across the integrated tension unit, and then down, up and over the thread take-up lever which is slotted (I love that)

Another nice feature is the pop-out clutch mechanism.  

Here are the various configurations of the accessory box and bed extension.  Fold it all up to pack it away, then flip out the extensions when you're sewing.  Genius!  (The only issue I have with this machine, though, is that the plastic piece that bridges the machine and accessory box is flimsy and easy to break.)


These portables even have a built-in buttonhole stitch!  You are limited on your sizes and widths, but they are quick and easy to do.  Several guides for the different size buttonholes fit right under the foot with nothing to install or fuss with. 


COMPARISON BETWEEN 1050 AND 1030
Two Mini Kennies


Three built-in stitches plus buttonhole on the 1030.  

I assume they added a few more stitches on the 1040/45, and then... 
NINE built-in stitches, including reverse stretch stitches, on the 1050.

A few more differences:  The 1030 doesn't have the recessed tension unit nor the super easy slot threading like the 1050, nor does it have the pop out clutch.  In this way it is a little more "old fashioned" which might not be a bad thing if you prefer the way it looks.

Which finally brings me to the question...