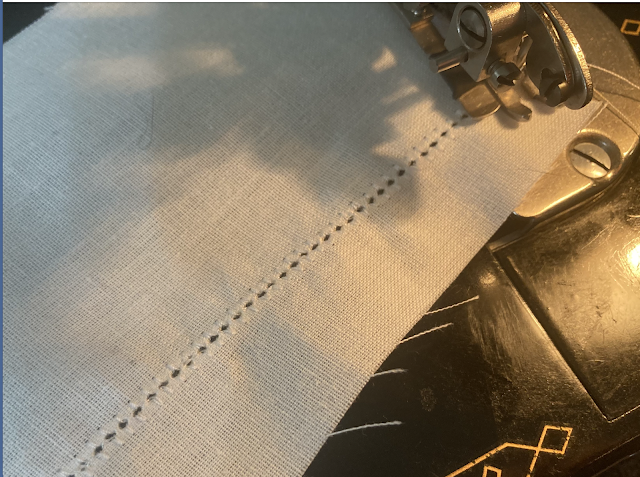
I am using the attachment on my 15-91. It only comes in a low shank, I guess they had abandoned the whole idea of it once the slant shanks came along.
The important thing to know is that this takes a very specific feed cover plate (NOT a normal feed cover plate.) This one has to accommodate the piercer. There are several different plates for the different Singer models. The one for the 15-91/201 seems to be the one most commonly found. The one for the Featherweight is almost impossible to find and cost upwards of $100 or more - just for the throat plate itself!
In case you want to know which is which, these are the part numbers (stamped on the back) for the throat plates for each of the machines.
So, like I said, I decided to give it another shot and I got pretty good results this time.
This is the front side of the work. I used contrasting thread for clarity, but classic hemstitching is usually white on white. (You can just clip the occasional fabric threads that get caught in the holes.)
This is the back side. I used regular iron on interfacing since this was just a sample. I'd use tear away stabilizer for the real thing.
So this didn't turn out too badly. But there are a few tricks to it:
1. Fabric preparation. You need to use a woven fabric with a medium weave. Too loose or too close of a weave and you won't get the nice, defined holes you're after. Originally tarlatan was used as a backing, but nowadays we have an array of stabilizers. If the hemstitching will be done on a double thickness of fabric, you're good. Just insert a lightweight interfacing in between. If it is done on a single thickness and both sides will show, you'll want to use a stabilizer you can remove. A tear-away or wash-away should work for this.
2. You have to be able to sew slowly. The way this works, you sew the first line, in which the piercer makes a hole while the needle makes a zigzag stitch next to it. You can stitch fairly fast here if you want. But the tricky part is when you turn the work around and make a second pass. Now the piercer goes back into the same holes while the needle makes a zigzag stitch on the other side.
Remember, to make this zigzag stitch the attachment moves the fabric back and forth. You have to keep all this perfectly lined up while the fabric is moving. This is the tricky part AND the key to pulling it off. It takes practice, I won't lie!
Here's my video showing how it's done. I apologize in advance, I don't do great videos, but it is enough to give the general idea.
This might not inspire anyone to go out and spend $50 on a hemstitcher, but they often come with old Singer machines you might buy, so now you know what to do with one if you happen to get it.
UPDATE: Here is the hard-to-find throat plate for the Featherweight, which I did find! So I was able to make a sample of hemstitching on my Featherweight. It's not something I'd do every day, but it is cool to know it can be done.
Hemstitching done on Featherweight 221 - just because I can.


Beautiful, I’ve wanted one of these for the longest time, but not for $50. Never understood why Singer didn’t put some hemstitch stitches on the cams.
ReplyDeleteWhat Singer could have done is make a hemstitch attachment like this for zz machines. Without the fabric moving back and forth, it would be a cinch to keep it in a straight line and so much easier to use.
DeleteThanks, I have bookmarked this. The magic button appears to be practice, else there is no magic button! I now have plates for my 15/201 and 66/99 machines, but think the plate for my 221s is not going to happen given current prices. My 201 will soon be on the bench to get it up and sewing, so I will start the experimentation with that.
ReplyDeleteThis is the most helpful video and explaination! Thank you
ReplyDelete