Frolic

Showing posts with label Patterns. Show all posts

Sunday, March 6, 2022

1 Hour Crossbody Cellphone Purse Made With Jellyroll Strips

 Like most sewers I am beguiled by jellyrolls and other quilting precuts.  However, I don't quilt! (except small items such as table runners, potholders, tote bags, etc.)  Quilting isn't my jam, but I like those tempting little packs of assorted coordinating fabrics and can't resist buying them now and then.

So here's a very quick and easy project using four jellyroll strips and a fat eighth (or 16"x 8" remnant.)  

Any beginner can make this project, and the hands-free cell phone bag is actually pretty useful.  I recently carried one of these when flying because I could keep my phone, ID and boarding pass handy while juggling through TSA.


MATERIALS

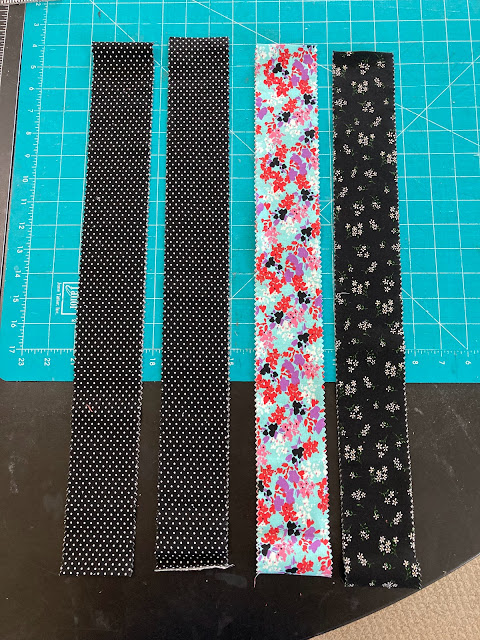
Start with four jellyroll strips in three different patterns.  Two of them the same (which will be the strap, d-ring tabs and flap) and two different ones for the main part of the bag.

The piece that will be the strap - one of the black dotted strips - is left full length.   Cut the other three
 strips in half.  


You'll also need the following:  Lightweight and heavyweight fusible interfacing plus hardware as shown 
3/4" D-rings, swivel clasps and slide buckle (optional).  Magnetic snap and 4" piece of velcro


Three half strips (21" long) will be pieced to make the main body of the bag

NOTE:  All 1/4" seam allowances throughout

Seam the three half strips lengthwise, press seams open and interface with a heavy fusible interfacing.


Mark center of middle section with a pin and line up at the 2-1/2" mark as shown above, then cut the pieced strip so that it measures 5" wide (you're cutting 3/4" off each side.)


From the 21" x 5" strip cut into three lengths as shown above:  

  • 2 @ 7" x 5" (for the Front and Back Exteriors) 
  • 1@ 5-1/4" x 5" (for the Front Pocket)  

From a fat eighth (or a 16" x 8" fabric remnant) cut a matching lining for each piece as shown


From the half length of the black dot, cut a 6" and a 9" length as shown above.  

These are all the pieces cut and ready to sew the bag.


PUTTING IT TOGETHER

To construct the bag, you are going to make two units - front and back - which will each have a exterior and lining piece.  These two units will be sewn right sides together then turned right side out.

1.  FRONT EXTERIOR SECTION

POCKET
Making Front Pocket

Make the front pocket as follows:  
  • sew the pocket lining and pocket right sides together along top edge.  Press seam open
  • On back side mark placement for the female side of the snap in the position shown above and install snap.
  • On the right side, sew the soft side of the velcro to the lining about 1/4" from the seam.
  • Turn piece wrong sides together and top stitch along upper edge.

Now sew the hook side of the velcro on the Front Exterior section as shown 
(a glue stick holds it in place while you sew.) 

                         Baste the pocket to the Front Exterior piece with a 1/8" seam.  This section is done.


2.  BACK EXTERIOR SECTION 

STRAP & D-RING TABS
With the 42" x 2-1/2" jelly roll strip, you will make your strap.  With 6" strip, make d-ring tabs

  • Add lightweight interfacing to strip 
  • Fold long edges to meet in the center and press
  • Fold in half lengthwise and press
  • Top stitch 1/8" along each side
  • Using the 6" x 2-1/2" strip, do the exact same thing to make the d-ring tabs (you will cut this piece in half to make the two tabs)

If the short ends of the strap are NOT on a selvedge, dab a little Fray Check on each end


FRONT FLAP
To make front flap
  • Apply interfacing to 9" x 2-1/2" strip
  • Fold in half widthwise, right sides together, and draw stitching lines as shown
  • Mark position for snap on wrong side as shown and install
  • Stitch along stitching lines, cut off the corners, and turn right side out
  • Top stitch 1/8" from edge around flap
Clip your d-ring taps and the front flap right side down on the Back Exterior Section and baste.  This section is now done.


FINAL ASSEMBLY

                Sew Front and Back Exteriors to the linings at the top edges and press seams open.


  • Clip the two units right sides together, matching linings and exteriors, and sew around with a 1/4" seam.  
  • Leave a 4" opening on the side of the lining for turning.  
  • Clip corners, turn right side out and poke out the corners with a chopstick.

Press raw edges of lining opening in, and stitch opening close to the edge.  
(On the side like this, it won't show!)


Tuck the lining inside, give it all a good press and steam (don't press the velcro!) and pop on the strap.

Add a cute button to the flap if you like!


Here's another full size purse I also made from the same jellyroll. 

Thursday, April 6, 2017

How to Make a Cover for your Featherweight Case

Finally, here is my pattern for making a cover for your Featherweight case. This does not enclose the case at the bottom, but just covers it to protect it from dust, scratches, and scuffs.
This fits the newer style case from about the 1950s.  The older ones, with the tray insert, have slightly different dimensions, so substitute your own measurements if necessary

These are the basic materials - a yard each of a main and contrast/lining fabric plus fusible fleece.  I don't show the piping here, but add that in as well as any other trims (rick rack, appliqué, or whatever) you want.


From the lining/contrast fabric:

Front/Back:  cut 2 @ 15-3/4" x 13-1/8"

Sides: cut 2 @ 9-1/4" x 13-1/8"

Top:  cut 1 @ 15-3/4" x 9-1/4"


From the main fabric and the fusible fleece:

Front/Back:  cut 2 @ 15-3/4" x 11-5/8"

Sides: cut 2 @ 9-1/4" x 11-5/8"

Top:  cut 1 @ 15-3/4" x 9-1/4"

Trim away 1/2" seam allowance before fusing the fleece in order to reduce bulk in the seams.  (NOTE: There is no seam allowance at the lower edge of the Front, Back, and Sides.)


Now cut out a 6-1/2" x 1" rectangle from the center of each Top section as shown:

On each piece, mark the corners with small dots at the seam allowance as shown.  NOTE: Seam allowance is 1/2"


Mark dots on corners at seam allowance (1/2" x 1/2")

To Sew

With Main fabric, sew Front and Back to Sides, stopping exactly on dots, and back stitch to reinforce. Press seams open.

Using the top cut from Contrast fabric, pin to the Sides, matching dots.  Begin and end seam exactly on the dots, and backstitch to reinforce.  These should meet at a perfect right angle, as shown below.


After Top is sewn at both Sides, pin it along Front/Back edges, folding back the seam allowance from the previous seams and matching dots.  Begin and end these seams exactly on the dots, reinforcing with backstitching as before.
Fold back previous seam allowance 

Here is how your corners will look when finished

You can slip this on over the case to help you shape it and lightly press the seams open (Careful, don't scorch your case!)  Trim corners, if you want, to make a neater finish.

Sew Lining in the same way with remaining pieces, then press under 1/2" on bottom edge.

Now, put the Main cover back on the case right side up and the Lining over it right side down (right sides together, in other words).  Match the openings and pin as shown

Sew around this opening about 1/4" from opening edge.  I used the wide toe of my presser foot as the guide.  (You have to turn it inside out to get in there to sew)  Reinforce at the corners as you turn.

Slash right up to the stitching at the corners and trim

Pull the lining through the opening, then you can put this back on the case to press it. (Again, not too hot, you don't want to damage the leather of your case!)  After pressing, topstitch around opening if desired.                            

With cover on the case pull Lining down tautly all around.  It will extend 1-1/2" beyond the bottom (with 1/2" previously pressed under.)  Turn this back up over the exterior and pin into place all around, matching corners first.

Insert piping between the layers if desired and sew the reverse hem with a zipper foot. 
Or sew the hem down with a decorative stitch, blind hem stitch (like an appliqué), or whatever you want.

And here is a variation of the Case Cover, which is a Machine Cover (or Cozy) to cover your Featherweight while it's not in use.
Case Cover and Machine Cover 

The instructions are exactly as for the Case Cover except to substitute the following measurements (and of course, you leave off the opening for the handle):

FINISHED SIZE:  16" long X 8.5" high X 7.5" wide

Exterior Fabric:

Top - 17" X 8.5"
Front/Back - 2@ 17" X 9.5"
Sides - 2@ 8.5" x 9.5"

Lining Fabric:

Top - 17" X 8.5"
Front/Back - 2@ 17" X 11"
Sides - 2@ 8.5" X 11" 

OPTIONAL:  To give the machine cover more structure I interlined it with flexible foam.  After sewing the Exterior together, I cut pieces of foam to fit each of the top, sides, front/back sections (use finished size measurements) then used spray adhesive to glue them into place before inserting the lining.

That's it!  If you make this, I'd love for you to send me a photo.