Frolic

Showing posts with label Attachments. Show all posts

Friday, August 3, 2018

Another Fun Gadget, the Underbraider

This is a gadget that I believe came standard in the attachment set of the older machines - I'm talking about the OLD black Singers from the early 20th century.  At that time, it was probably common to adorn garments with braid, thus the underbraider which attached it from the bobbin-facing side of the fabric, as the name implies.

For this attachment, it doesn't matter which shank type you have, but you do have to have a machine which has the holes in the bed and the throat plate that match up with the slot to screw it on, and the little clamp that holds it in place.  The majority of old Singers have this configuration - this is on my Singer 237.


So what you do is insert braid, or whatever 1/8" embellishment you're using, into the slot:


Another thing you must have is the short, open-toed quilting foot.  A regular straight stitch presser foot won't work because the toes are too long and too close together to allow for the slot that feeds the braid/ribbon.

HOWEVER...

Here's a good thing to know: if you don't have that type of quilting foot available, then you can use your button foot!  That is what I'm using here.  It is almost exactly the same and works perfectly well.


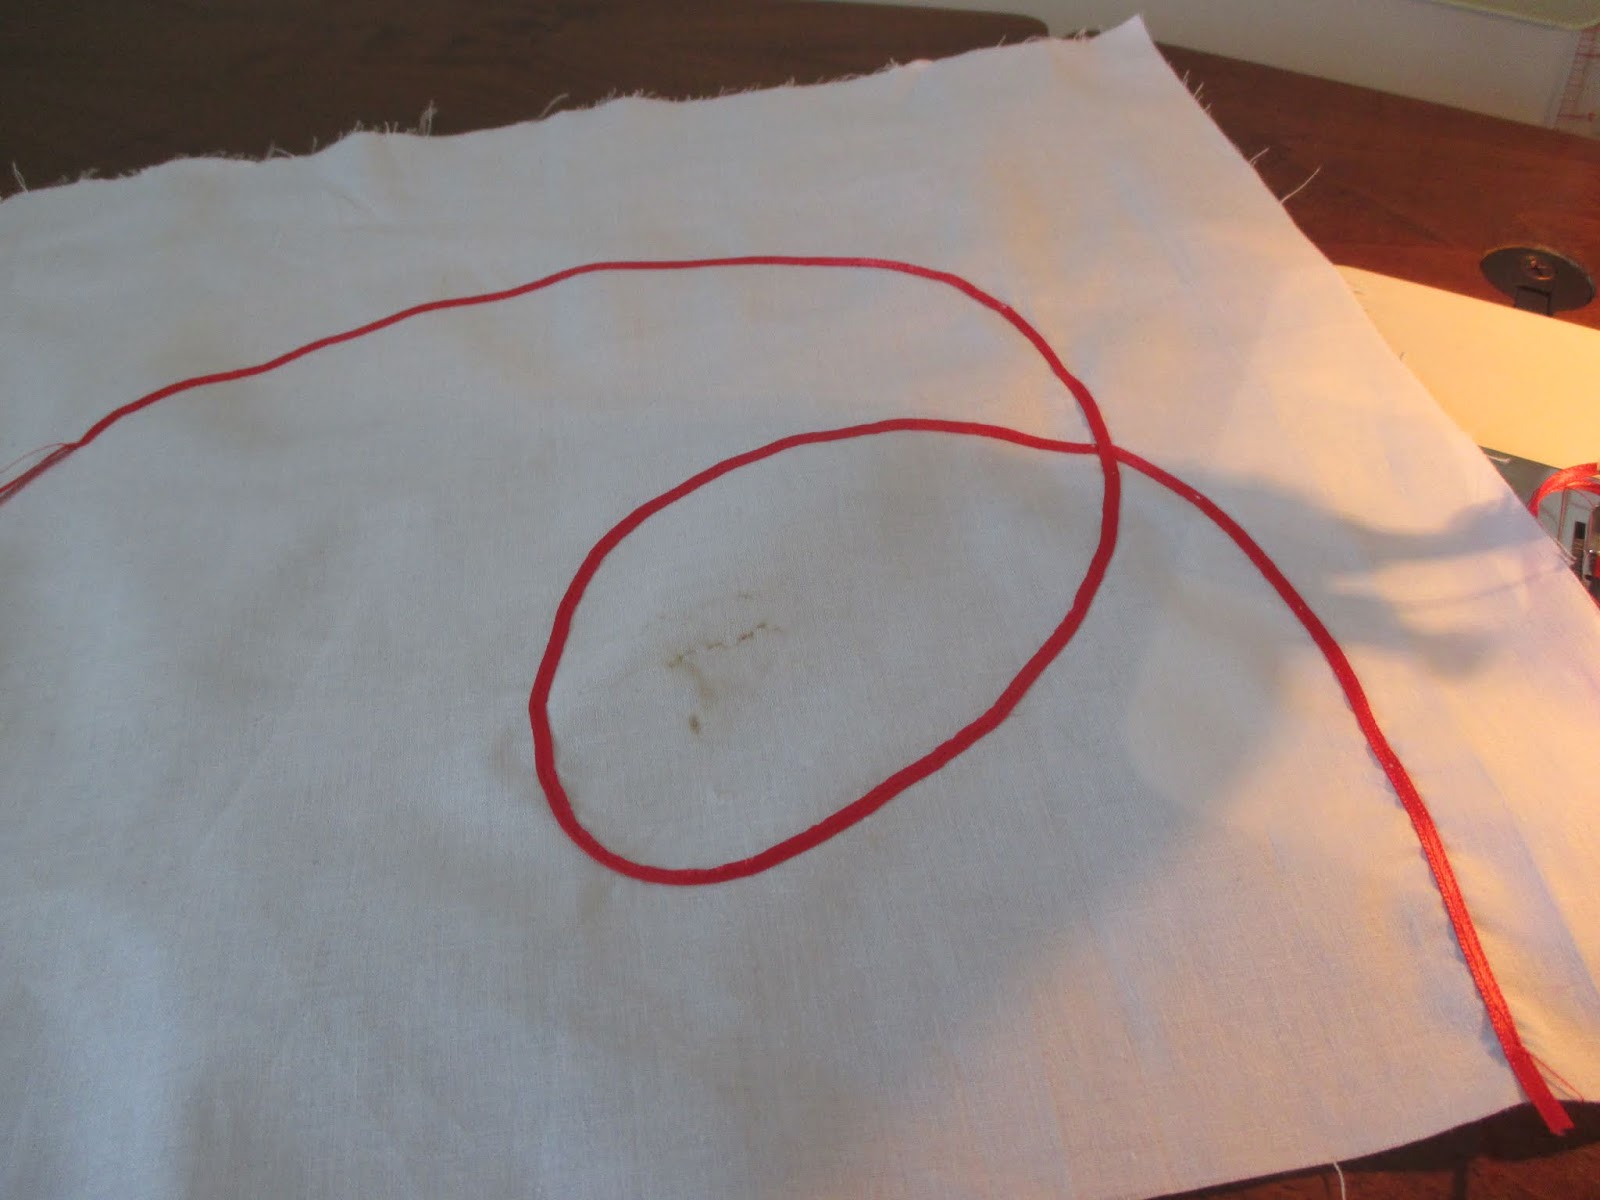
So naturally you match your bobbin thread to the embellishment you are sewing on which is going onto the right side of the fabric which is face down.  If you are following some kind of outline or design, you can sketch that on the back of the fabric which is face up.  Now sew!

Let me take a moment and point out how quietly and smoothly this machine sews.  I like it better each time I use it.   Excellent machine!


And here is the right side  (this fabric sample is an old press cloth so please excuse the scorch marks!)


What I think will be even more useful for me is sewing on tiny rick-rack.  If you are so lucky as to have some vintage baby rick-rack, this is the perfect gadget for sewing it on.  (Modern baby rick-rack isn't as tiny as the older kind, and may not fit.)

I collect vintage rick-rack.  I love this stuff!

So if you are making a hem, for example, and want rick-rack along the hemline, you can do it in one operation from the wrong side.

You can't tell, but this is very tiny rick-rack, just 1/8" wide

The top thread popped through a bit here, so I could have adjusted the tensions.  But you can still get the idea.

This gadget won't necessarily rock your world, but if you happen to find one in an old box of attachments like I did, now you'll know what to do with it.


Saturday, March 17, 2018

Fun with Singer Bias Cutter and Bias Binder

Here are a couple of really cool gadgets from the Singer Tool Box.  Top is the bias binder, and below its the bias gauge cutter.

Now imagine it is 1955, and we are going to cut and apply a bias edging.  First we have to cut the bias strips 15/16" to fit the binder attachment and we do it with this little device.


Before I go any further - Yes, I know there is a method where you can cut continuous bias strips after marking cutting lines and making a couple of seams in a bias cut piece of fabric.  I do that myself sometimes.  But for the fun of it, let's just assume we only need a short bias strip so we're going to cut and seam it the old-fashioned way.

First I'll mark off my first bias line, and cut it.

(And yes, I "cheated" and used the rotary cutter for the first line.)


Now I don't have to mark off any more lines to get perfectly even strips.  I just attach this gizmo to the tip of my scissors and cut.


That little square next to the B is where you set the gauge for how wide you want your strips to be.
F = facing,  B = binding, C = cording.  I have it on B to get the required 15/16" inch strips that work in the binding attachment.

You attach it to the tip of your scissors as shown above, then you insert the edge of the fabric in the slot and start cutting - the strips come out perfect!

(If you have a good eye, you'll see I had the gauge set a tad past the B so my strip is a full inch wide. Oops!)


To seam, line up your strips this way.  Then press the seam open and cut off the little points.


So now you put your strip into the largest slot on your bias binder, then attach it to the machine. (It is easier to do it that way.) Feed the edge of your fabric into the slot between folds and sew.


The binding attachment folds and sews it on in one step!


How cool is that?

Sunday, February 11, 2018

The Singer Hemstitcher

The Singer Hemstitcher is a fairly complicated little gadget that I never had much luck using in the past.  However, after some recent online chatter on the subject,  I decided to take it out and give it another shot.


I am using the attachment on my 15-91.  It only comes in a low shank, I guess they had abandoned the whole idea of it once the slant shanks came along.


The important thing to know is that this takes a very specific feed cover plate (NOT a normal feed cover plate.)  This one has to accommodate the piercer.  There are several different plates for the different Singer models.  The one for the 15-91/201 seems to be the one most commonly found.  The one for the Featherweight is almost impossible to find and cost upwards of $100 or more - just for the throat plate itself!


In case you want to know which is which, these are the part numbers (stamped on the back) for the throat plates for each of the machines. 

So, like I said, I decided to give it another shot and I got pretty good results this time.
This is the front side of the work.  I used contrasting thread for clarity, but classic hemstitching is usually white on white.  (You can just clip the occasional fabric threads that get caught in the holes.)


This is the back side.  I used regular iron on interfacing since this was just a sample.  I'd use tear away stabilizer for the real thing.

So this didn't turn out too badly.  But there are a few tricks to it:

1.  Fabric preparation.  You need to use a woven fabric with a medium weave.  Too loose or too close of a weave and you won't get the nice, defined holes you're after.  Originally tarlatan was used as a backing, but nowadays we have an array of stabilizers.  If the hemstitching will be done on a double thickness of fabric, you're good.  Just insert a lightweight interfacing in between.  If it is done on a single thickness and both sides will show, you'll want to use a stabilizer you can remove.  A tear-away or wash-away should work for this.

2.  You have to be able to sew slowly.  The way this works, you sew the first line, in which the piercer makes a hole while the needle makes a zigzag stitch next to it. You can stitch fairly fast here if you want.  But the tricky part is when you turn the work around and make a second pass.  Now the piercer goes back into the same holes while the needle makes a zigzag stitch on the other side.

Remember, to make this zigzag stitch the attachment moves the fabric back and forth.  You have to keep all this perfectly lined up while the fabric is moving.  This is the tricky part AND the key to pulling it off.  It takes practice, I won't lie!  

Here's my video showing how it's done.  I apologize in advance, I don't do great videos, but it is enough to give the general idea.


This might not inspire anyone to go out and spend $50 on a hemstitcher, but they often come with old Singer machines you might buy, so now you know what to do with one if you happen to get it.

UPDATE:  Here is the hard-to-find throat plate for the Featherweight, which I did find!  So I was able to make a sample of hemstitching on my Featherweight.  It's not something I'd do every day, but it is cool to know it can be done.


Hemstitching done on Featherweight 221 - just because I can.


Saturday, January 21, 2017

How to Blind Hem on a Straight Stitch Machine (Just for Kicks)

I will acknowledge is that it is unlikely that anyone (myself included) will ever actually do this.  I usually either blind stitch by hand or on my ZZ machine.  But part of the fun of using vintage straight-stitch Singers is exploring the ingenious methods they had for doing tasks that require a zigzag.

There is an attachment made specifically for blind hemming on a straight stitcher, and as far as I know, it is only available for low-shank machines. (ETA:  I recently found out that this actually does come in a slant shank version for the 301 and 404 slant straight stitchers.)
Singer Blind Stitch Attachment for low shank straight stitch machines. 
Here it is blind stitching on my Featherweight.


Here's how it looks on the right side (with contrasting thread so you can see it.)


But just supposing I want to blind hem on one of my straight stitch slant shanks and I didn't have that attachment.  Then I'd reach for this:

This is a gadget Singer made to do zigzag and other decorative stitches on straight stitch machines.  Mostly those would have been low shank machines like the 15-91, 201, or 221.  The 301 and 404 are (as far as I'm aware) the only two straight stitch slant shanks, and there is a version of the Automatic Zigzagger for these machines which is harder to find, but not impossible.

This thing is HEAVY, it weighs almost a pound with the cam inserted!  This is the basic zigzag cam.


So getting ready to make my hem, the first thing I might do is finish the raw edge with a zigzag stitch.  This was done on that unwieldy gizmo shown above, and it did an acceptable job.


Now I'm ready to do the blind hem, and this is the cam that does it


Set it up to blind hem in the usual way.  I have adjusted the bight so that the zz will fall right on that left guideline on the foot.  I just keep the folded edge on that line while I'm stitching


Unlike a typical blind hem stitch that does several straight stitches followed by a left zigzag stitch, this one makes a half-circle between each zigzag.


And this is how it looks on the right side.
(same fabric, different lighting)


Yes, I have just made a blind hem on an old straight stitching sewing machine!  There is something kind of satisfying in knowing it can be done this way, even if you would never actually do it, right?


Tuesday, January 17, 2017

That Little Green Box


I've always assumed that everyone was familiar with all the common feet that came in the little green box with old Singer machines.  I've used them all my life and never gave it a second thought.  But recently I've noticed people asking about these attachments as if they aren't familiar with them. And I've also noticed that some of the modern versions - like the ruffler foot - are rather pricey.  But if you have a low or slant shank sewing machine, you can use any of these vintage attachments.  They are dirt cheap - you can usually get an entire box of assorted attachments like this on eBay for about $20.  (Make sure you get the proper attachments - low or slant shank - for your machine.)


First up is the binder attachment.  Most of these have multiple slots for different widths of bias tape.

(Actually supposed to be in the second slot, my bad!)
I used 1/2" single fold bias tape.  I inserted it into the second largest slot which is easier to do BEFORE attaching it to the machine.

Slide your fabric in between the folded tape and sew.  Easy as that.


Even better, you can use unfolded bias strips of 15/16" that you make yourself.  You insert this into the largest slot, and it will fold and apply the strip all in one step:


How about that?


Next is the ruffler.  In spite of being the most intimidating looking of all the feet in your box, this one is actually one of the easiest to use.  And its kind of fun too. 
Those numbered notches indicate how many stitches will be made between each pleat. (The * setting is for doing straight stitch without removing the foot.)  You can adjust stitch length along with these settings to get the fullness you want.     


Here I have it set on 6, which means a pleat every six stitches.


Perfect pleats in seconds, and so easy to do.

A little faster this time, and on a different machine:


One of the trickier feet to master is the rolled hem foot.  But once you get the hang of it, it makes a beautiful, perfect hem.  Just keep in mind that the softer and lighter the fabric, the trickier it can be. For those fabrics, try lightly starching the edge to be hemmed to give it enough body to behave in the hemmer.

The trick is to finger press the hem a couple of inches before you start.  Take a couple of stitches, then lift the presser foot and wiggle your hem into the scroll, then lower it and stitch away.  

Once you get going, just make sure to feed the fabric evenly into the scroll so it doesn't turn under too much or too little. 

Perfect, tiny rolled hem edge


Then there's the edgestitcher.  The simplest thing is does is stitch right on the edge of the fabric.  


If you're into heirloom sewing, you can use it to join two pieces of lace right on the very edge:


Right on the very edge -  with matching thread the join would be invisble


The adjustable hemmer also takes some practice, and I never use it.  
But just to prove it CAN be done, here you go:


                 And of course the zipper foot is a common, every day foot that needs no explanation

And the ever so humble gathering foot shouldn't be overlooked.  It is perfect for when you need just a little gathering to ease in a sleeve cap, for example.  This is easier and less "messy" than drawing up a gathering thread.  (The longer the stitch, the fuller the gathers.)


Monday, October 10, 2016

Singer Deluxe Monogrammer

This is one of the best attachments for your 401!  It does work on other machines as well - it comes in a slant shank version for the 401, 403, 500, 503, 600 and also a low shank version for your 319, 328 or other low shank zigzag machines.  (It only works with zigzag machines.)

You start out by installing the feed cover plate and then the attachment.  The feed cover plate will vary by machine, and it might be a trick to find the right one.  But the one that fits Slant-O-Matics like the 401 usually comes with the slant shank version of the monogrammer. 

You insert the plastic letter template (flat piece sticking out on the left) and crank it in, then you use the plastic letter guide to show you where to begin stitching.

Then off you go!


This is a fantastic attachment that makes spectacular monograms.   Here are a few samples:


Now...about the letter cams.   When the monogrammers were originally sold, they came with a flower cam and THREE letters of your choice.  So when you see these for sale on ebay, they come with only a few - if any - cams.  It is VERY rare to find an entire set of them and if you do it will run you close to $200.  However, you can sometimes find individual cams for sale here and there.  What all this means is that collecting the cams can be costly and time consuming.  It takes some persistence - I've been collecting several years and finally have the complete set of cams!


And how about that shamrock! (it comes with the Kenmore version of this monogrammer)